• Thế Giới Giải Mã

    Bí ẩn nhân loại Leonardo Da Vinci

  • Thế Giới Giải Mã

    Anh hùng thầm lặng Nikola Tesla

  • Thế Giới Giải Mã

    Thần đèn Thomas Edison

  • Thế Giới Giải Mã

    Người thôi miên Adolf Hitler

Showing posts with label eclipse. Show all posts

24 October 2018

Cannot install remote marketplace locations - Fix issue eclipse - Cách khắc phục lỗi

Fix Issue
//Open command line bypass proxy
setx _JAVA_OPTIONS -Djava.net.preferIPv4Stack=true
Reset Eclipse OK!

13 August 2016

Cài đặt UTF8 cho Eclipse Java

Windows -> Preferences -> General -> Workspace -> Text file encoding -> Other -> UTF8

12 August 2016

Cài đặt tự động thêm chú thích tác giả @Author và phiên bản @Version trong Eclipse Java

Windown->Preferences->Java->Code Style->Code Templates
Nếu muốn hiển thị tự động thì chọn  Automatically

14 July 2016

Java Eclipse class diagrams Tạo diagrams trong Eclipse

1. In order to install ObjectAid UML Explorer in Eclipse, go to Help -> Install New Software…
Figure 1: Install New Software
Figure 1 : Install New Software
2. Paste this URL : http://www.objectaid.net/update in the Work with text field.
Figure 2 : Add URL
Figure 2 : Add URL
3. Click Add and put ObjectAid in the Name field and click OK.
Figure 3 : Add Resource
4. Select all the plugins you want to install and click Next.
Figure 4 : Select plugins
5. You will see an overview of your installation.
Figure 6 : Installation Overview
Figure 5 : Installation Overview
6. Accept the Licence Agreement and click Finish.
Figure 5 : Accept the Licence Aggreement
Figure 6 : Accept the Licence Agreement
7. Give it some time to install the new Software.
Figure 7 : installing...
Figure 7 : installing…
It is likely the a Warning will pop up during installation. Click OK to ignore it.
Figure 8 : Ingore Warning
8. When the installation finishes, you will be prompt to restart your Eclipse IDE. Click Yes.
Figure 9 : Restart Eclipse IDE

2. Create a Simple class Diagram

When your Eclipse IDE restarts, this is how you can create a Class diagram for one of your projects.
1. On the Project Explorer, Right Click on the Project’s name -> New -> Other. On the pop up box, start typingClass Diagram in the Wizards text field. Click on the Class Diagram and then click Next.
Figure 10 : Add new Class Diagram
2. Type in a name for the diagram file, and select the several details and options.
Figure 11 : Diagram Name and Options
3. After that the blanc page of the Class Diagram editor will open. From then you can Drag and Drop a class from Project Explorer in order to create it’s UML node in the Diagram. Here is a simple Class Diagram that I’ve constructed.
Figure 12 : A simple Class Diagram
by:javacodegeeks

07 July 2016

Lỗi java.lang.outofmemoryerror java heap space eclipse và cách khắc phục trong Eclipse Java

How To Increase JVM Heap Size In Eclipse

Lỗi này được biết đến là kích thước bộ nhớ đã bị tràn vị vậy ta phải cài đặt lại cho eclipse 
Eclipse throws java.lang.OutOfMemoryError: Java heap space

Following are the steps to increase JVM heap size in Eclipse: 

Step 1 - Bước 1
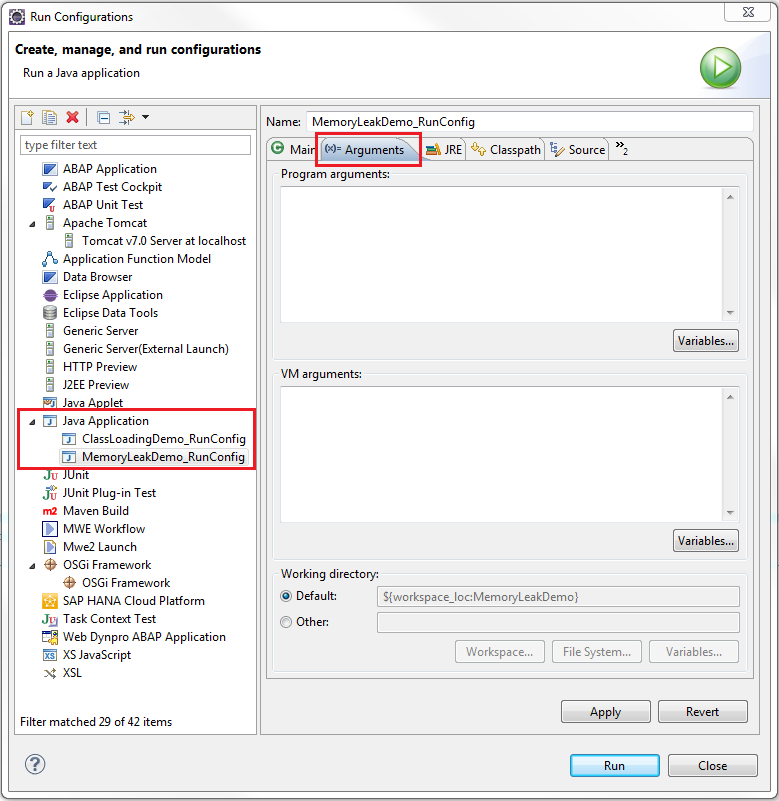
Open Eclipse and in the toolbar menu, go to Run -> Run Configurations…
Step 2- Bước 2
In the left pane of Run Configurations window, navigate to the Java Application node and select the Java application for which you need to increase the heap size. Then in the right pane, click on the Arguments tab.
In the VM Arguments section, type the following arguments:
-Xms[CUSTOM_SIZE] – This means that your JVM will be started with Xms amount of memory
-Xmx[CUSTOM_SIZE] – This means that your JVM will be able to use a maximum of Xmx amount of memory.
For example,
-Xms512M – JVM will start with an initial memory size of 512 MB
-Xmx1024M – and can use up to a maximum of 1024 MB (or 1 GB).
Click on Apply button to save the changes.
Note
The memory settings for Java programs running in Eclipse are different from the memory settings for eclipse itself. For increasing or decreasing the amount of memory used by Eclipse, changes should be made in the eclipse.ini file and NOT in the Run Configuration.

15 May 2016

How to install Swing in Eclipse Cài đặt Swing trong eclipse

  • khởi động Eclipse lên và vào phần Help => Install New Software.    
1.png
1.png


2.png
2.png


  •   Chọn tất cả các API sau đó nhấn next. Phần mềm sẽ tự động cài đặt cho các bạn. Có thể thời gian cài đặt sẽ hơi lâu. Các bạn cố gắng chờ nhé :)
3.png
3.png


  •   Sau đó các bạn chuyển tiếp next
4.png
4.png


  •   Chọn I accept the terms of the license agreement
5.png
5.png

  •     Phần mềm sẽ tiếp tục cài đặt
6.png
6.png

  • Nếu có cảnh báo các bạn nhấn OK nhé
  • Sau khi cài đặt xong các bạn nhấn Yes để khởi động lại eclips
7.PNG
7.PNG

  • Sau khi cài đặt thành công các bạn sẽ thấy các component trong mục Swing Designer
8.PNG
8.PNG

  •  Và đây là cửa sổ Swing trong eclipse của các bạn nhé :)
9.PNG
9.PNG

12 May 2016

How to install Eclipse with JDK

1 - http://www.oracle.com/technetwork/java/javase/downloads/index.html  >> Download  JDK


Demo: JDK win 32

Install JDK

2 - https://eclipse.org/downloads/   >> Download eclipse


Extract eclipse.zip to C:/   


06 April 2016

Phím tắt trong Eclipse

Phím tắt thông dụng trong Eclipse giúp thao tác nhanh
Viết tắt code

main => Ctrl + Space => public static void main(String[] args) {}

syso hoặc sout => Ctrl + Space => System.out.println(” “);

Các phím tắt thường dùng

Ctrl + B : Build project

Ctrl + D : Xóa dòng code

Alt + lên/xuống : Di chuyển dòng lên/xuống

Ctrl + F : Tìm chuỗi trong class

Ctrl + H : Mở nhanh màn hình search

Ctrl + O : Nhảy nhanh tới 1 hàm trong class

Ctrl + E : Nhảy nhanh tới 1 tab trong các tất cả các tab

Ctrl + W : Đóng tab hiện tại

Ctrl + Shift + W : Đóng toàn bộ các tab đang mở

Alt + trái/phải : Nhảy qua tab bên trái/phải

Shift + Tab : Tác dụng ngược lại với phím Tab

Ctrl + Shift + O : Tự động bổ sung thư viện thừa thiếu

Ctrl + Shift + C : Comment code

Shift + Alt + J :  Comment method tự động

Ctrl + Shift + F : Format code

Shift + Ctrl + Y : To lower case  'abcd'

Shift + Ctrl + X : To upper case  'ABCD'

Tự động tạo code

Alt + Shift + S, V : Override hoặc implement một hàm

Alt + Shift + S, R : Tạo hàm getter, setter cho field trong class

Alt + Shift + S, C : Tạo hàm khởi tạo bằng cách override hàm khởi tạo lớp cha

Alt + Shift + S, O : Tạo hàm khởi tạo bằng các field trong class

Bôi đen phần cần chọn

Shift + alt + Left : Chọn phần tử trước

Shift + Ctrl + Right : Chọn từ tiếp theo

Shift + End : Chọn cuối dòng

Shift + Alt + A : Chuyển đổi lựa chọn khối

Shift + Alt + Right : Chọn phần tử tiếp theo

Shift + Ctrl + Left : Chọn từ trước

Shift + Home : Chọn đầu dòng

Comment Code

Ctrl + / : Tự động thêm hoặc bỏ đi dấu “//” để comment hoặc bỏ comment code

Note: Bôi đen khi sử dụng

Ctrl+ shift + \ : Mở comment đoạn code được chọn

Ctrl+ shift + / : Comment đoạn code được chọn bằng /* */


BACK TO TOP

Xuống cuối trang