React JS Cheat Sheet


The Mysteries of Humanity: Leonardo da Vinci

The Unsung Hero: Nikola Tesla

The Wizard of Light: Thomas Edison

Adolf Hitler: The Master Manipulator


class PanelComponent extends React.Component {
  constructor(props){
    super(props);
  }
  render() {
    return (
      <div>
      {this.props.child1}
      {this.props.child2}
      </div>
    );
  }
}
 function Child1Component() {
   return(
     <div className="bg-danger">
        Component-1
     </div>
   );
 }
 function Child2Component() {
   return(
     <div className="bg-primary">
        Component-2
     </div>
   );
 }
ReactDOM.render(
  <PanelComponent child1={<Child1Component/>} child2={<Child2Component/>}/>,
  document.getElementById('root')
);


// Cách 1: Use React.createClass
var HelloWorld = React.createClass({
  getInitialState() {
    return { message: 'Hi' };
  },

  logMessage() {
    // this magically works because React.createClass autobinds.
    console.log(this.state.message);
  },

  render() {
    return (
      <input type="button" value="Log" onClick={this.logMessage} />
    );
  }
});

// Cách 2: Bind in Render
class HelloWorld extends React.Component {
  constructor(props) {
    super(props);
    this.state = { message: 'Hi' };
  }

  logMessage() {
    // This works because of the bind in render below.
    console.log(this.state.message);
  }

  render() {
    return (
      <input type="button" value="Log" onClick={this.logMessage.bind(this)} />
    );
  }
}

// Cách 3: Use Arrow Function in Render
class HelloWorld extends React.Component {
  constructor(props) {
    super(props);
    this.state = { message: 'Hi' };
  }

  logMessage() {
    // This works because of the arrow function in render below.
    console.log(this.state.message);
  }

  render() {
    return (
      <input type="button" value="Log" onClick={() => this.logMessage()} />
    );
  }
}

// Cách 4: Bind in Constructor
class HelloWorld extends React.Component {
  constructor(props) {
    super(props);
    this.state = { message: 'Hi' };
    this.logMessage = this.logMessage.bind(this);
  }

  logMessage() {
    // This works because of the bind in the constructor above.
    console.log(this.state.message);
  }

  render() {
    return (
      <input type="button" value="Log" onClick={this.logMessage} />
    );
  }
}

// Cách 5: Arrow Function in Class Property
class HelloWorld extends React.Component {
  // Note that state is a property,
  // so no constructor is needed in this case.
  state = {
    message: 'Hi'
  };

  logMessage = () => {
    // This works because arrow funcs adopt the this binding of the enclosing scope.
    console.log(this.state.message);
  };

  render() {
    return (
      <input type="button" value="Log" onClick={this.logMessage} />
    );
  }
}

class Parent extends React.Component {
    constructor (props) {
        super(props);
        this.state = {}
    }
    onChangeParent(field, value) {
        this.setState({field: field,value: value});
    }
    render () {
        return (<div>
          <Child onChangeChildRefe={this.onChangeParent.bind(this)} />
          <span>Output: {this.state.value}</span><br/>
          <span>InputName: {this.state.field}</span>
        </div>);
    }
}

class Child extends React.Component {
    constructor (props) {
        super(props);
    }
    onChangeChild(field, value) {
        this.props.onChangeChildRefe(field, value);
    }
    render () {
        return <GrandChild onChangeGrandChildRefe={this.onChangeChild.bind(this)} />
    }
}

class GrandChild extends React.Component {
    constructor (props) {
        super(props);
    }
    onFieldChange(event) {
        const fieldName = event.target.name;
        const fieldValue = event.target.value;
        console.log(fieldName+" - "+fieldValue);
        this.props.onChangeGrandChildRefe(fieldName, fieldValue);
    }
    render () {
        return (<form>
          Input: <input type="text" name="jobNumber" onChange={this.onFieldChange.bind(this)} />
        </form>)
    }
}

ReactDOM.render(
  <Parent/ >
  ,document.getElementById('root'));


class FormComponent extends React.Component {
  constructor(props){
      super(props);
      this.state = {color: 'ping', isCheck: true, name: ''};
  }
  handleChange = (event) => {
    const target = event.target;
    let value = null;
    if(target.type === 'checkbox'){
      value =  target.checked;
      this.setState({color: value});
    } else {
      value =  target.value;
      this.setState({color: value});
    }
    this.setState({name: value});
  }
  handleSubmit = (event) => {
    alert(this.state.name);
    event.preventDefault();
  }
  render() {
    return (
      <form onSubmit={this.handleSubmit} className="mt-3 ml-3">
        <select value={this.state.color} onChange={this.handleChange} className="form-control col-4 col-sm-4 col-md-3 col-lg-2">
          <option value="red">red</option>
          <option value="green">green</option>
          <option selected value="ping">ping</option>
          <option value="orange">orange</option>
        </select>
        <div class="form-check">
          <label class="form-check-label">
            <input type="checkbox" value={this.state.isCheck} onChange={this.handleChange} class="form-check-input"/>
            Check me out
          </label>
        </div>
        <button type="submit" className="btn btn-warning ml-2">Submit</button>
      </form>
    );
  }
}

ReactDOM.render(
  <FormComponent/ >
  ,document.getElementById('root'));


class FormComponent extends React.Component {
  constructor(props){
      super(props);
      this.state = {color: 'ping'};
  }
  handleChange = (event) => {
    this.setState({color: event.target.value})
  }
  handleSubmit = (event) => {
    alert("This is "+this.state.color+" color");
    event.preventDefault();
  }
  render() {
    return (
      <form onSubmit={this.handleSubmit} className="mt-3 ml-3 form-row">
        <select value={this.state.color} onChange={this.handleChange} className="form-control col-4 col-sm-4 col-md-3 col-lg-2">
          <option value="red">red</option>
          <option value="green">green</option>
          <option selected value="ping">ping</option>
          <option value="ogran">ogran</option>
        </select>
        <button type="submit" className="btn btn-warning ml-2">Submit</button>
      </form>
    );
  }
}

ReactDOM.render(
  <FormComponent/ >
  ,document.getElementById('root'));


class FormComponent extends React.Component {
  constructor(props){
      super(props);
      this.state = {firstName: ""};
      this.state = {lastName: ""};
  }
  handleFirst = (event) => {
    this.setState({firstName: event.target.value});
  }
  handleLast = (event) => {
    this.setState({lastName: event.target.value});
  }
  handleSubmit = (event) => {
    alert(this.state.lastName +" "+ this.state.firstName);
    event.preventDefault();
  }
  render() {
    return (
      <form className="mt-3 ml-2" onSubmit={this.handleSubmit}>
          <div className="col-sm-3 mb-2">
            <input type="text" className="form-control" placeholder="First name" value={this.state.firstName} onChange={this.handleFirst}/>
          </div>
          <div className="col-sm-3 mb-2">
            <input type="text" className="form-control" placeholder="Last name" value={this.state.lastName} onChange={this.handleLast}/>
          </div>
          <div className="col-sm-3">
            <input type="submit" className="btn btn-primary" value="Submit"/>
          </div>
      </form>
    );
  }
}

ReactDOM.render(
  <FormComponent/ >
  ,document.getElementById('root'));

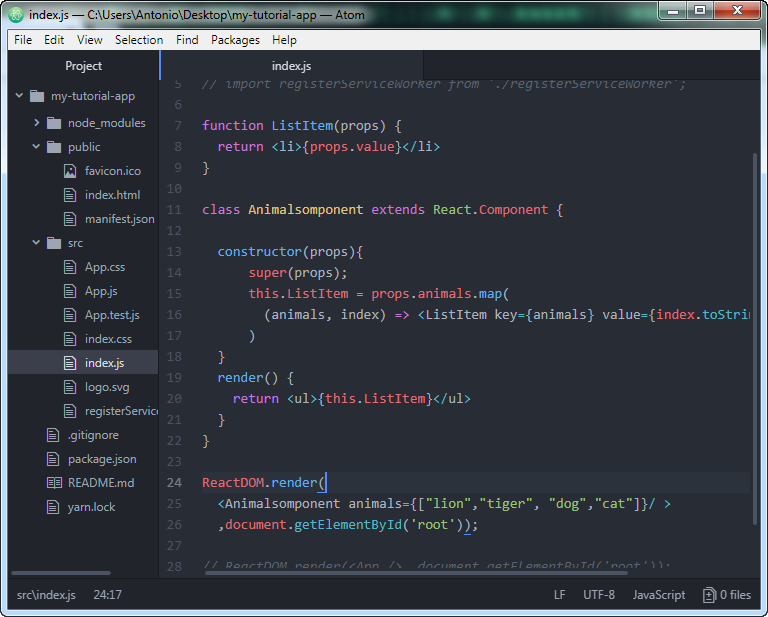
function ListItem(props) {
  return <li>{props.value}</li>
}

class Animalsomponent extends React.Component {

  constructor(props){
      super(props);
      this.ListItem = props.animals.map(
        (animals, index) => <ListItem key={animals} value={index.toString()+"-"+animals}/>
      )
  }
  render() {
    return <ul>{this.ListItem}</ul>
  }
}

ReactDOM.render(
  <Animalsomponent animals={["lion","tiger", "dog","cat"]}/ >
  ,document.getElementById('root'));


function ListItem(props) {
  return <li>{props.value}</li>
}

class Animalsomponent extends React.Component {

  constructor(props){
      super(props);
      this.ListItem = props.animals.map(
        (animals, index) => <ListItem key={animals.id} value={index.toString()+"-"+animals.name}/>
      )
  }
  render() {
    return <ul>{this.ListItem}</ul>
  }
}
const itemList = [
  {
    id: 1,
    name: "Lion"
  },{
    id: 2,
    name: "bear"
  },{
    id: 3,
    name: "tiger"
  }
];
ReactDOM.render(
  <Animalsomponent animals={itemList}/ >
  ,document.getElementById('root'));


class LoginComponent extends React.Component {

  constructor(props){
      super(props);
      this.state = {isLoggedIn: false};
  }
  handleLogout = () => {
    this.setState({isLoggedIn: false})
  }
  handleLogin = () => {
    this.setState({isLoggedIn: true})
  }
  render() {
    let myButton = null;
    if(this.state.isLoggedIn){
      myButton = <button onClick={this.handleLogout}>Logout</button>
    } else {
      myButton = <button onClick={this.handleLogin}>Login</button>
    }
    return (
      <div> {myButton} </div>
    );
  }
}

ReactDOM.render(
  <LoginComponent />
  ,document.getElementById('root'));


BACK TO TOP


